Create your own blog website using Hugo in less than 1 hour for free
In the technical age, publishing articles online is a great way to express yourself. It can be of any form like tutorial, blogs, reviews, editorials and much more.
It is almost defacto to use Medium for blogging now a days. It provides many benefits like :
- Focus only on content. Formatting is handled by Medium platform
- SEO (Search Engine Optimization) to promote the article in google search
- Easy interface to write article in browser itself
- And many more like support for images, videos and code reference using Gist
Then Why should you have your own blog?
Having your own blog provide the chance to add one more aspect of social presence. You can control the content as you want and decide whether your content should be paid or open to all. You can also use this blog website as your portfolio if you want.
How did I do it?
After writing couple of articles on medium. I though of setting up my own blog website. I looked into couple of options like :
These platform provide end to end solution to setup a website. In this setup, one need to think about website template, database, hosting and siteadmin management . These platform are either paid or partially free. But as the title of the article suggest, I wanted to create blog for free. And I bet you are also here for the same.
Apart from being free I also wanted the blog setup to be minimal. That means I only wanted to manage the content of the blog and not the look and feel or formatting. So that I can save myself from the hassle of managing UX, Styling, Hosting, Database and other elements of website management. It was inspired from the experience of writing a blog on Medium. Just write the content at correct location and Boom!!.
I was aware that github allow you to have single User and multiple project website hosting for free if this is a open source project. You can read about it here.
But the only catch is github pages only support static website ( no Server, no Database). Thus I wanted a way to generate static website with evolving content.
Here comes the Hugo
My search brought me to an awesome framework called Hugo. Quoting from the official website
Hugo is one of the most popular open-source static site generators. With its amazing speed and flexibility, Hugo makes building websites fun again.
Hugo can be used for complete Content Management where content can be provided in many ways. It has lot of feature for customization and organizing the content. For the brevity of the blog I would not go into the details of Hugo. Remember we have less than 1 hour.
Shut Up!! and Show me the code
Ok.. Lets do that
We gonna need to do exactly 5 steps to set up our website:
- Download and Set up Hugo
- Create Project
- Write Your Blog
- Set up git repositories
- Push your content and Done!!
I have followed the same steps while creating my own blog website. You can check it here Bhanu Chaddha’s blog
1. Download and Set up Hugo
You can follow the setup instructions from Hugo’s official website. They have instruction for each platform. I will be using Mac in this tutorial.
After set up is completed. You can check if Hugo is installed correctly using below command. It should print current installed versions of Hugo
hugo version
Hugo Static Site Generator v0.55.6/extended darwin/amd64 BuildDate: unknown
Lets move on to next step.
2. Create Project
If you want to check out the finished blog you can check at demoblog-bhanuchaddha.github.io. We will create similar website in this blog.
Go to your terminal and run below commands
hugo new site demo-blog
You would see below result. Basic hugo project is ready now.
Congratulations! Your new Hugo site is created in /Users/bhanuchaddha/Documents/project/demo-blog.
Just a few more steps and you're ready to go:
1. Download a theme into the same-named folder.
Choose a theme from https://themes.gohugo.io/, or
create your own with the "hugo new theme <THEMENAME>" command.
2. Perhaps you want to add some content. You can add single files
with "hugo new <SECTIONNAME>/<FILENAME>.<FORMAT>".
3. Start the built-in live server via "hugo server".
Visit https://gohugo.io/ for quick start guide and full documentation.
Hugo at core is static site generator. But it does not govern look and feel of the website. One can create different type of websites using Hugo like Landing Page, Blog, Company website, Documentation, Portfolio, Resume and Podcast. One can decide own layout and presentation and organize the different elements as he may wish. But thankfully you dont have to create everything from the search. You can use any of the exiting Hugo’s themes and customize it.
For this blog website we would use Casper Two theme.
Theme Installation
Type below commands to install the theme.
~/Documents/project cd demo-blog
# Initialize git repository
~/Documents/project/demo-blog git init
Initialized empty Git repository in /Users/bhanuchaddha/Documents/project/demo-blog/.git/
Installing theme here is not same as installing Hugo. We would just map theme as sub-module in our git project. By doing this we would not clone the theme in the project but just add the reference of casper-two theme. Hugo will automatically use the theme while generating the static content. For the context of this blog you dont need to know about the git sub-modules. You can just follow the commands as specified. If you wish to read about git sub-modules, you can read about it here
# Adding theme as sub-module
git sub-module add https://github.com/eueung/hugo-casper-two.git themes/casper-two
You will see below output
Cloning into 'casper-two'...
remote: Enumerating objects: 522, done.
remote: Total 522 (delta 0), reused 0 (delta 0), pack-reused 522
Receiving objects: 100% (522/522), 3.96 MiB | 5.28 MiB/s, done.
Resolving deltas: 100% (233/233), done.
Adding Configuration
Open the project in code editor of your choice. I would be using VSCode in this tutorial.
Replace content in config.toml file with below
baseurl = ""
theme = "casper-two"
languageCode = "en-US"
disqusShortname = ""
paginate = 6
#SectionPagesMenu = "main"
[params]
title = "<Your Name>'s blog"
subtitle = "Blog | Tutorial"
cover = ""
description = "<Your Name>'s blog"
metaDescription = ""
googleAnalytics = ""
customCSS = []
RSSLink = ""
twitterName = "<Your twitter username>"
fbName = "<Your fb username>"
githubName = "<Your github username>"
linkedinName = "<Your linkedin username>"
# mediumName = "<Your medium username>" // disabled medium link
logo = ""
orgName = "EM"
orgWebsite = ""
orgDescription = ""
author = "EM"
authorAvatar = ""
authorLocation = "<Your Location>"
authorWebsite = ""
authorDescription = ""
pageNotFoundTitle = "404 - Page not found"
#casper or caspertwo
singleViewStyle = "casper"
[permalinks]
post = "/:slug/"
[[menu.main]]
name = "Blog"
url = "/"
weight = 200
[[menu.main]]
name = "Tutorial"
url = "/categories/tutorial/"
weight = 5
If you wish to see final configuration, you can check it here
Now go to the root directory demo-blog and run below command
hugo server
This will start a local server at http://localhost:1313. If you go to this url using any browser, you should see below

Wow!! your blog website is almost setup. The only thing missing is your first blog. Which we would write in next section.
Additionally You can modify configuration of the blog by changing the properties in config.toml.
- baseurl is used to specify the homepage url. It is used as root of the blog. I would come back to this later in blog.
- cover can be used to configure the cover image ( similar to facebook) of the blog.
- authorAvatar can be used to configure the logo of the author. This logo is present below each article in-front of author name. Check the logo in front of author name in this blog.
- menu of the blog is decided by the configuration elements like
[[menu.main]] name = "Blog" url = "/" weight = 200. Here we have configured one main menu and one category menu. This category menu points to thetutorialcategory. Later in tutorial I would explain how to specify the category of the blog.
Thats it for basic structure, lets create our first blog now.
3. Write your first blog
Go to content directory in the project and create new directory named post. Name of the directory is important here.
Inside post directory create new file named first-blog.md[1]. Here file extension stands for MarkDown. This is wildly popular way to format the text with minimal boilerplate. You can read further about it here
Copy the below content in the first-blog.md and save the changes.[2]
---
title: "First Blog"
date: 2019-06-06T22:11:42+02:00
author: "<Your Name>"
linktitle: First Blog
weight: 1
#authorAvatar: image/logo.svg
image: image/first-blog.png
tags : [
"firstBlog",
"tutorial",
]
categories : [
"tutorial"
]
draft: false
---
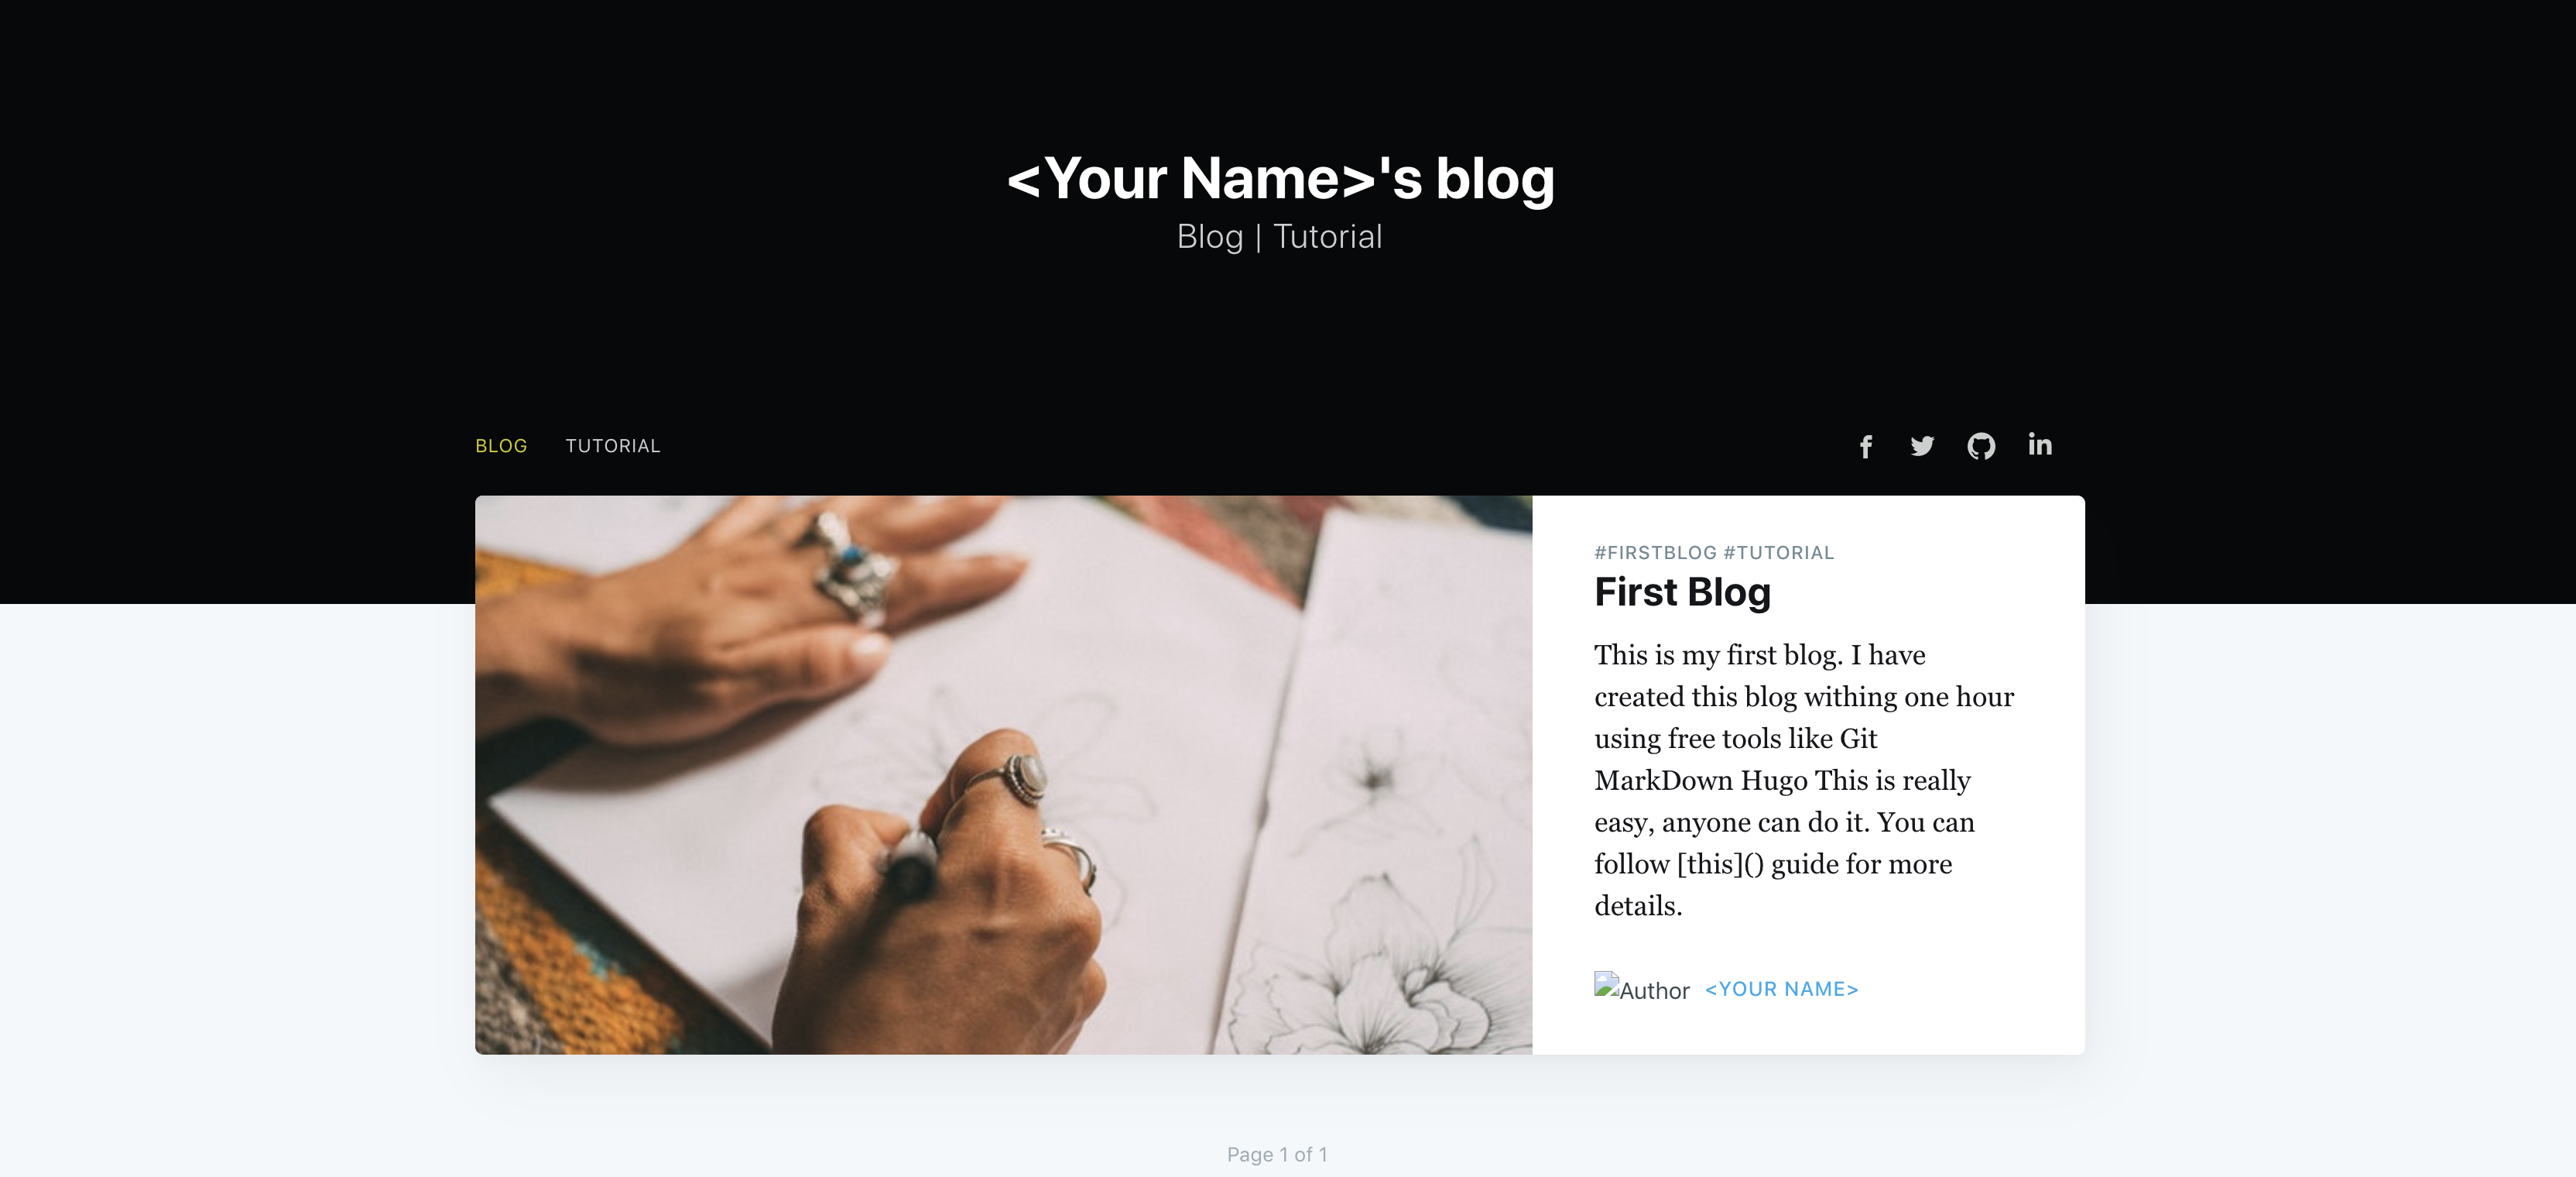
This is my first blog. I have created this blog within one hour using free tools like
* GitHub
* MarkDown
* Hugo
This is really easy and anyone can do it. You can follow [this](https://bhanuchaddha.github.io/create-your-own-blog-website-using-hugo-in-less-than-1-hour-for-free/) guide for more details.
Now take any image and put that inside image folder inside static folder in the project. If image directory do not exist create it. Rename this image to first-blog.png. For this blog I am taking image from awesome free image resource Pexels.[3]
Now go to http://localhost:1313 you will see below
Awesome!!! isn’t it. Your blog website is up and running. And It only took some configuration and text files.
If the server is not running already, execute below command to start the server again.
hugo server
So what the hell we have done above. Let me Explain
- [1] To create new blog you just need to create new
*.mdfile inpostfolder. - [2] Top of the blog content between
---lines is called front matter. This is metadata of the blog and let you add author, tags and catagories to the blog. - [3] For each blog you need to have a cover image. This image is configured using
imagefront matter key. Cover image is mandatory.
Now when your website is ready, Its time to publish this website.
Set up Git repositories
We will create 2 GitHub repositories for the project
- First Repository for main project
demo-blog - Second repository to host our blog as Github User page
We would also link both these repositories using Github sub-modules.
Create a repository like https://github.com/bhanuchaddha/demo-blog. And one more repository like https://github.com/bhanuchaddha/demoblog-bhanuchaddha.github.io. Second repository must be in <Your-Github-User-Name>.github.io format. It is important because Github allows only 1 User/Organization page. We are using Github User page for this blog. Github initialize the static website for us if you specify .github.io at the end of a repository name.
Now go to the root of the project and execute below commands.
# set sub-module mapping
git sub-module add -b master https://github.com/<Your-Github-User-Name>/<Your-Github-User-Name>.github.io public
# commit any uncommitted changes
git commit -a -m "init"
# set remote origin branch
# git remote add origin https://github.com/<Your-Github-User-Name>/demo-blog.git
git remote add origin https://github.com/<Your-Github-User-Name>/demo-blog.git
# push changes
git push -u origin master
We have mapped public directory in root as sub-module, which is mapped to <Your-GitHub-User-Name>>.github.io repository. If you check the public directory it is empty now.
But if you run below command in the root directory. You will see Hugo generate the static content based upon the configuration and content.
Before generate static content, there is one last thing we need to change in our config.toml file. Remember we kept baseurl as empty. Because now we know the url of our blog website repository, we can set this value. Set below for baseurl
"https://<Your-GitHub-User-Name>.github.io"
Runt the command now
hugo -t casper-two
Push your content
Now we have set up our repositories and created our static content in public directory . The only step remain is pushing our local content to GitHub. Lets do that now. Run below commands in the terminal
# go to public directory
cd public
# commit static content
git commit -a -m "init blog content"
# push your content
git push
And thats it. Now if you go to https://
You can match your content and configuration with below repositories. The only difference is the value of baseurl that is because I have set up this demo website as Project Site and not the User Site.
From here
Now you can update your first-blog.md file or write new blog by creating more *.md files in post directory. Do remember to add front matter on the top of each blog file. After creating new blog files just repeat below steps to publish your new blog
- Generate static content using
hugo -t casper-twocommand. - Go to public directory and commit your changes
- Go back to main directory and commit your changes.
If you are still reading this blog. I know it was a long post . But I hope it was worth it. Do reach me out if you have any questions.